 Photoroom
 LetsEnhance
 Magnific
 Ideogram
 Kittl
Kittl Phot.AI
 CHATGPT
 Canva AI
 Adobe Express
 Fotor
Fotor Topaz Photo AI
 NightCafe
Stable Diffusion Review
What is Stable Diffusion? It is not an app you sign up for. It is a model: a set of files you download and run on your own computer, inside a program you choose, to turn a text prompt into AI art. You pay only for the electricity or computer time you use, not a monthly fee, and there are no content filters unless you add your own.
A tool called ControlNet lets you guide the pose, depth, and edges of an image. You can also feed in an existing photo and change it with a prompt, called image to image. Training methods called LoRA and Dreambooth teach the model your own pictures, so it can copy a style, a character, or a product. A REST API lets other programs run Stable Diffusion for you, without opening the app at all.
Stable Diffusion real-world tests
Four hard prompts, graded honestly
We gave Stable Diffusion four hard prompts to test. One asked for the same woman across three scenes. One asked for a realistic portrait. One asked for exact text on a poster. One asked for close-up detail on an object. We graded each image two ways. First, content match: did it include what we asked for? Second, visual quality: does it look like a real photo or piece of art? Two prompts passed and two failed. We show the failures too, because these are our own honest tests, not ads.
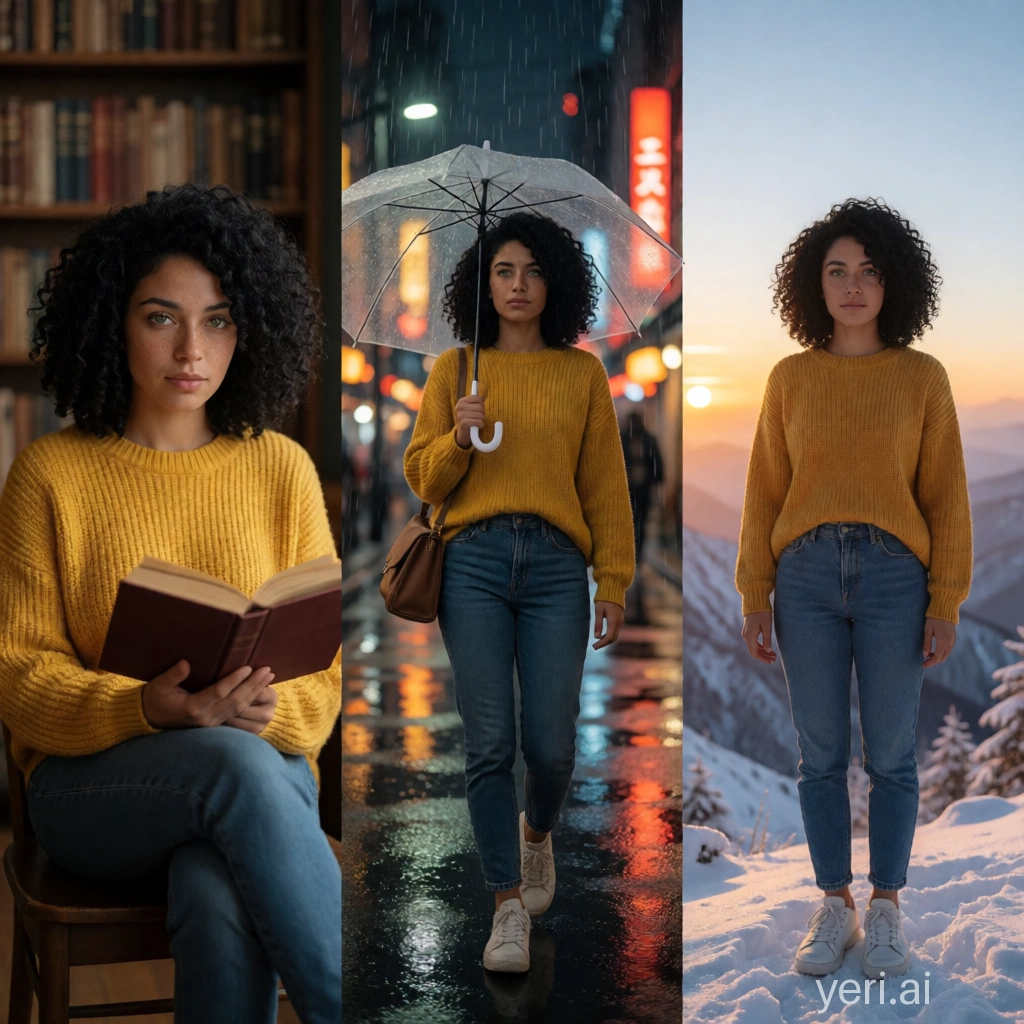
Prompt: "A cinematic triptych featuring the same woman in every panel: shoulder-length curly black hair, green eyes, freckles, mustard-yellow sweater, blue jeans, white sneakers. Panel 1: library; Panel 2: rainy Tokyo street with a transparent umbrella; Panel 3: snowy mountain at sunrise. Identity must remain identical across all three."
Content match: 85/100. All three scenes and the described features are there, and the layout is correct.
Visual quality: 60/100. This is the weak spot. The woman's face changes slightly between panels, and the skin and faces look waxy and AI-made instead of real.
Verdict: Strong scene ideas, but the same face does not hold up across all three panels.
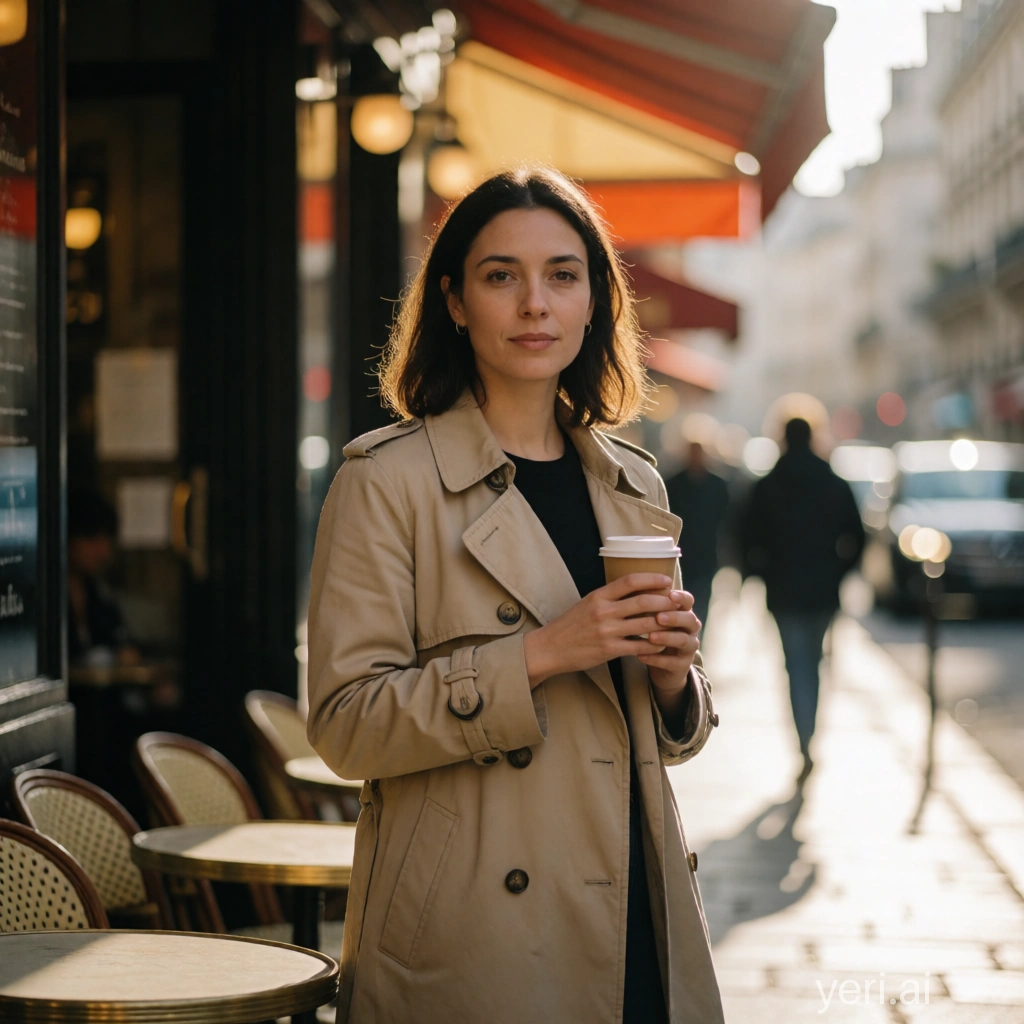
Prompt: "A candid street portrait of a 27-year-old woman standing outside a small Paris café during golden hour, wearing a beige trench coat and holding a takeaway coffee… 85mm f/1.4, natural skin texture, anatomically correct hands, shallow bokeh, ultra-photorealistic, RAW quality."
Content match: 85/100. Everything asked for is there: the woman, the beige coat, the coffee, the street cafe, and the golden-hour light. We cannot check the camera settings just by looking at the image.
Visual quality: 60/100. This is the weak spot. The skin and face look AI-made, not like a real photo, even though the prompt asked for that exact look.
Verdict: The content is right, but it does not look like a real photo.
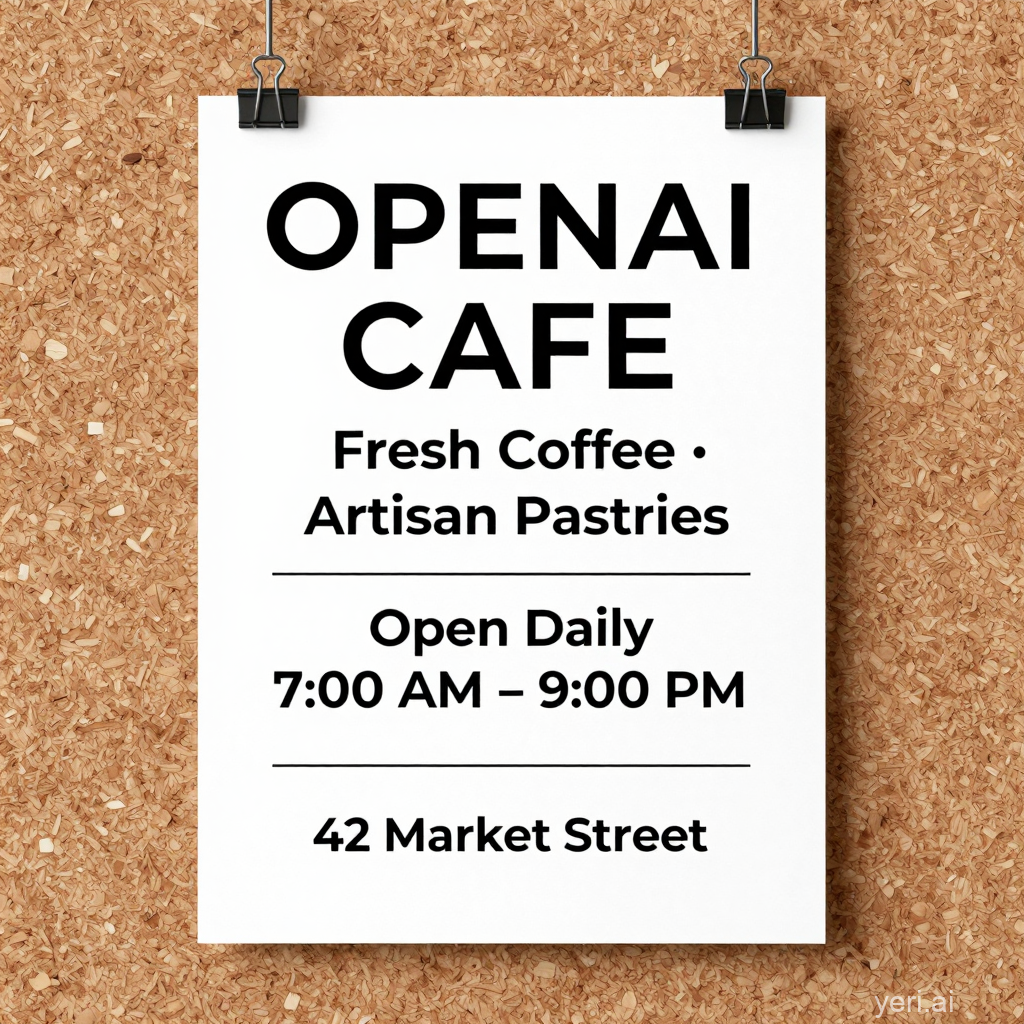
Prompt: "Design a premium modern coffee shop poster pinned to a corkboard containing exactly this text: OPENAI CAFE · Fresh Coffee • Artisan Pastries · Open Daily 7:00 AM – 9:00 PM · 42 Market Street. Elegant sans-serif typography, balanced spacing, realistic paper texture, every word spelled exactly. No additional text."
Content match: 100/100. Every line of text is spelled correctly, with nothing extra added.
Visual quality: 94/100. Clean lettering, good spacing, and a paper texture that looks pinned to a real corkboard, shadows included.
Verdict: A strong result. Getting text exactly right inside an image is hard, and it did that well here.
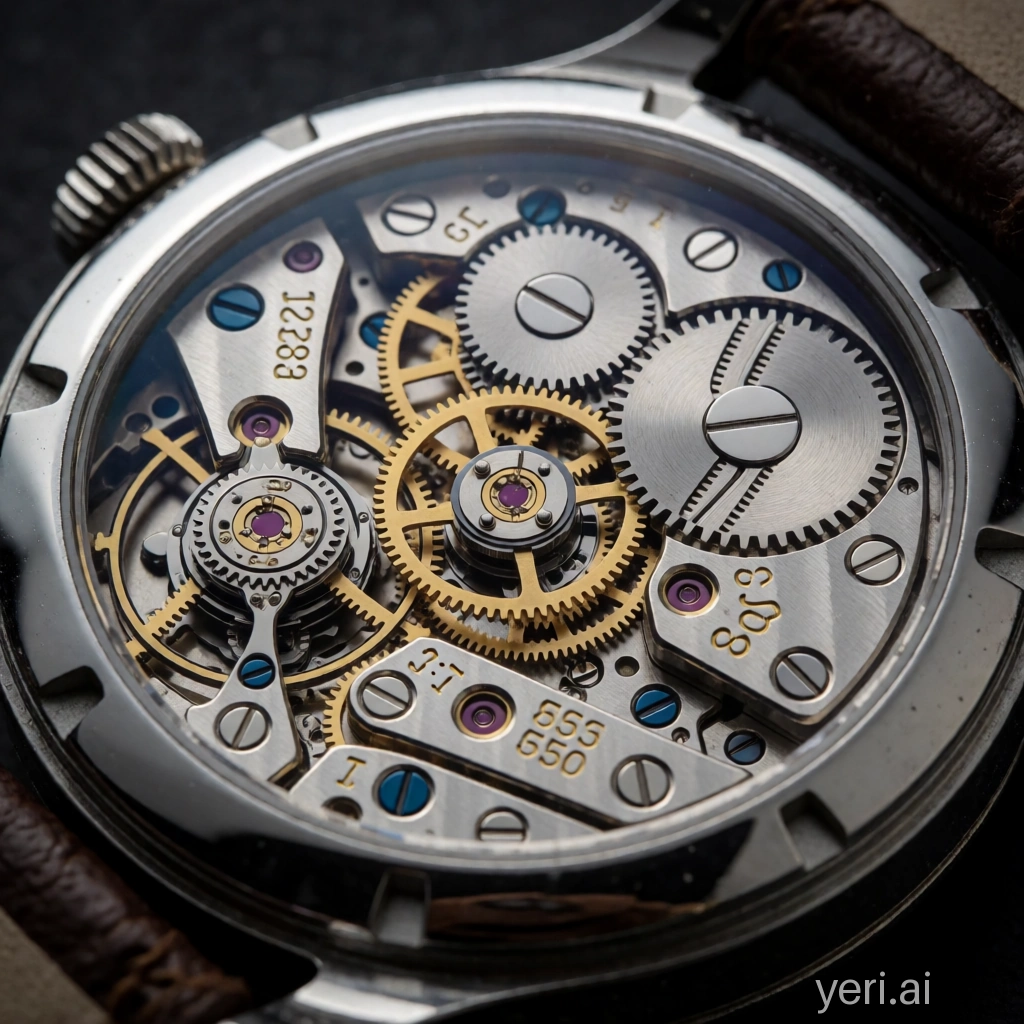
Prompt: "A professional macro photograph of an antique mechanical wristwatch with its back removed: hundreds of machined gears, ruby bearings, springs, engraved serial numbers, polished screws, brushed steel, oil sheen, dramatic studio lighting. 3:1 magnification, hyper-realistic 8K product photography."
Content match: 85/100. The gears, ruby bearings, springs, serial numbers, screws, and brushed steel are all there. Dust and tiny scratches are less visible than asked for.
Visual quality: 90/100. Sharp detail, gears that look correctly shaped, and lighting with real-looking metal reflections.
Verdict: A strong close-up result that holds up under a closer look.
Summary of all four tests
| # | Prompt subject | Content match | Visual quality | Overall |
|---|---|---|---|---|
| 1 | Same woman, three scenes | 85/100 | 60/100 | ❌ FAIL |
| 2 | Paris cafe portrait, golden hour | 85/100 | 60/100 | ❌ FAIL |
| 3 | Coffee shop poster, exact text | 100/100 | 94/100 | ✅ PASS |
| 4 | Antique watch, close-up 8K | 85/100 | 90/100 | ✅ PASS |
Two passes and two fails show a clear pattern. Stable Diffusion is great at putting exact text inside an image. The coffee shop poster scored a perfect 100/100 on content. It is also strong at close-up product detail, as the antique watch test showed. Its weak spot is realistic human faces. Both the single portrait and the three-panel test failed on visual quality, with skin and faces that look AI-made instead of real.
Bottom line: Stable Diffusion is a good pick for lettering and product or close-up shots. It is less reliable when you need a face that looks like a real photo, and even less reliable at keeping the same face consistent across several images.
Stable Diffusion, the open-source AI engine
behind everything else
Stable Diffusion works differently from most other tools in this category. Most AI image tools are platforms. You use their app, their computer power, and their rules. Stable Diffusion is a model instead. It is a set of files, released under an open licence, that runs on your own computer or server, inside whichever app you choose to install.
That one difference changes everything. You pay no monthly fee beyond your own electricity or computer costs. There are no content filters unless you add them yourself. There is no limit that stops your work at 3am. There are no terms of service that can take away your commercial rights without warning.
There is a real trade-off, though. Stable Diffusion rewards people willing to spend time on setup. If you just want to type a prompt and get a finished image in 30 seconds, Midjourney is the faster choice. If you want control, automation, image-to-image editing, and the ability to train the model on your own pictures, Stable Diffusion is the right tool.
Stable Diffusion is not really a product. It is more like infrastructure, similar to choosing your own database instead of a managed service. More work at the start, but you own it completely.
Installing Stable Diffusion, you pick your interface
then it opens up
Stable Diffusion has no official app. Your first choice is which interface to install. AUTOMATIC1111 (A1111) is the standard pick: a browser-based tool that runs on your own computer, shows almost every setting, and has the most add-ons. ComfyUI is the other option. It uses nodes and boxes instead of a plain menu, so it is more powerful but takes longer to learn.
The hardest part of session one is not understanding how the AI model works. It is getting Python set up correctly. Before you can make a single image, you need the right version of Python, Git, a working CUDA setup on Windows, or the right Metal setup on Mac. Knowing this ahead of time, and having a troubleshooting guide ready, is the difference between finishing session one with an image or with frustration.
- Install Python, Git, and CUDA (Windows) or the Metal backend (Mac)
- Download and open AUTOMATIC1111 or ComfyUI from a terminal
- Download a starting model, SD 1.5 or SDXL, from HuggingFace or Civitai
- Write your first prompt, and set the sampling steps and CFG scale
- Generate an image, and notice the first result is not the final answer
- Spend the rest of the session testing settings to see what each one does
Session one gives you an image. Sessions two through twenty give you control. The learning curve is real, and so is what you get once you are past it.
How to install Stable Diffusion
AUTOMATIC1111 setup from scratch
The fastest way to run Stable Diffusion on your own computer is AUTOMATIC1111. Here is the full setup process for Windows and Mac.
Download Python 3.10 from python.org. On Windows, check the box that says "Add Python to PATH" during install. Version 3.10 works best. Newer versions can cause problems with some add-ons.
Download and install Git from git-scm.com. You need this to download AUTOMATIC1111 and to add extensions later.
Open a terminal and run: git clone https://github.com/AUTOMATIC1111/stable-diffusion-webui.git. Then move into the folder: cd stable-diffusion-webui.
Download a model file (ending in .safetensors or .ckpt) from HuggingFace or Civitai. Put it in the models/Stable-diffusion/ folder inside your AUTOMATIC1111 folder. SD 1.5 is the lightest place to start. SDXL gives better quality.
On Windows, double-click webui-user.bat. On Mac or Linux, run ./webui.sh. The first launch downloads everything it needs, so it takes a few minutes. Once it is done, open your browser and go to localhost:7860.
- CUDA not found on Windows: check that your NVIDIA drivers are up to date and CUDA is installed
- Python version conflict: AUTOMATIC1111 works best on exactly Python 3.10, not 3.11 or 3.12
- Mac Metal issues: add
--skip-torch-cuda-test --upcast-sampling --no-half-vaeto your launch settings - Out of memory on your first image: lower the resolution, or add the
--medvramor--lowvramflag
Stable Diffusion prompt engineering
how to write prompts that actually work
Every Stable Diffusion result comes down to one thing: the prompt. Two people can use the exact same model and get very different results, just because of how they wrote the prompt. Writing good prompts is not a small extra skill here. It is the difference between a blurry, broken image and a sharp, finished piece of AI art.
Closed platforms often quietly rewrite your prompt for you. Stable Diffusion does not. It sends your words to the model almost exactly as you typed them. That means it is up to you to add structure, emphasis, and things to avoid. The good news is you can learn this in one afternoon, once you understand the four building blocks below.
The most reliable order is: subject, then style, then lighting and framing, then quality words. For example: "a red vintage bicycle, oil painting, golden hour lighting, close-up, highly detailed." Put your subject first. Words near the start of the prompt matter more to the final image.
A negative prompt tells the model what to avoid, without wasting words describing it the positive way. A good starting negative prompt is: "blurry, low quality, extra limbs, deformed hands, watermark, text, bad anatomy." This is the fastest fix for the classic Stable Diffusion problem of odd hands and limbs.
Put a word in parentheses to make it stronger. For example, (neon lighting:1.4) pushes that idea harder than the normal weight of 1.0. Square brackets do the opposite and make a word weaker. Use weighting when the model is ignoring part of a longer prompt.
Stuffing a prompt with 40 or more competing words waters all of them down. Vague words like "beautiful" or "amazing" do almost nothing. The model needs plain, specific details instead. Forgetting a negative prompt is the most common reason a first image looks unfinished.
Example prompt library: four starting points you can change for your own AI art, each paired with a negative prompt to keep the output clean.
Good AI art from Stable Diffusion is rarely just luck. It comes from a clear prompt, a sensible negative prompt, and weighting used only where the model needs a nudge.
Stable Diffusion image-to-image
change any existing photo with a text prompt
Image-to-image, or img2img, is one of Stable Diffusion's most useful tools, and one people often skip. Text-to-image starts from nothing. Img2img starts with a picture you already have, such as a photo, a sketch, a product render, or an app screen, and changes it based on a text prompt.
The main setting to know is denoising strength. At 0.0, the output looks the same as the input. At 1.0, the model ignores the input almost completely and makes something new. The useful range is 0.3 to 0.7. In that range, the output keeps the shape of your original image while adding the style or details from your prompt.
Take a photo and turn it into an oil painting, a watercolour, an anime style, or any other look, using a prompt. The layout and subject stay the same, but the style changes completely. This is a common choice for social posts and other creative work.
Change one part of an existing photo, such as the lighting, the background, or the clothing, without redoing the whole image. Combined with inpainting, you can pick one area to change and leave the rest untouched.
Take one plain product photo and create new versions of it with different backgrounds, lighting, or colours, without reshooting. Online stores use img2img to build a whole set of product photos from a single starting shot.
Upload a rough sketch or wireframe and ask Stable Diffusion to turn it into a finished drawing, a product mockup, or a building render. The shapes in the sketch stay the same. The model adds the finished look.
Mark one area of an image and generate new content only in that area. You can remove objects, swap out backgrounds, or add new elements. Inpainting is built into AUTOMATIC1111's img2img tab, and it is one of the most useful photo-editing tools it offers.
Start with a rough idea from text, then use img2img to refine it step by step toward the final result. This is faster than starting from zero each time. Concept artists, game designers, and filmmakers use this to explore ideas quickly.
Stable Diffusion ControlNet
a tool that turns generation into direction
Most reviews compare Stable Diffusion to Midjourney on image quality alone and say Midjourney wins. That comparison misses the point. Midjourney is built for one thing: type a prompt, get a nice-looking image. Stable Diffusion is built for control, automation, and connecting to other tools.
ControlNet lets you guide an image using a reference picture. You can control the pose, the depth, the edges, or turn a line drawing into a finished image. Instead of just hoping the model understands your prompt, you give it a clear shape to follow. This is what turns Stable Diffusion from a fun toy into a tool you can actually rely on for real work.
- OpenPose: copy a body pose from a reference photo before you generate
- Depth map: keep the front-to-back layout of the scene correct
- Canny edge: keep the exact outlines from a sketch or line drawing
- Normal map: copy the surface detail and lighting from a reference image
- Combine several ControlNet settings at once for pose, depth, and edges together
- Add a LoRA fine-tune on top to keep the same character in a set pose
ControlNet is the real unlock. Once you understand pose and depth control, Stable Diffusion stops feeling random and starts feeling like a precise tool.
Architectural visualisation workflow
from hand sketch to finished exterior
Building visuals are one of the clearest examples of why ControlNet matters. A rough hand-drawn sketch of a building or floor plan is not finished art on its own. But run through the right ControlNet setup, it becomes the guide for a full, realistic-looking exterior render.
Scan or photograph the hand-drawn sketch, whether it is a building front, a floor plan, or an elevation, in good light with as little shadow as possible. Clean, clear lines give a cleaner ControlNet result.
In AUTOMATIC1111's ControlNet panel, upload the sketch and pick the Canny option. This pulls out the line work and locks the model to that outline while it generates.
Add a second ControlNet layer using the depth option. This keeps the front-to-back layout correct, so the final render does not look flat.
Describe the surfaces clearly: "glass curtain wall, exposed concrete, timber cladding, matte black steel trim." Naming the materials is what turns a generic render into a specific, believable one.
Add a lighting mood to the prompt, such as "golden hour," "overcast diffuse light," or "dusk with interior lights on." Set the denoising strength between 0.6 and 0.8 to balance keeping the sketch shape and letting the model add detail.
The sketch sets the shape. ControlNet holds that shape steady. The prompt fills in everything the sketch could not show: material, light, and mood.
AUTOMATIC1111 vs ComfyUI
which Stable Diffusion interface should you use?
Stable Diffusion has no official app of its own. The two main choices are AUTOMATIC1111 and ComfyUI, and they suit different people and different stages of a project.
- A simple tabbed layout that is easy to find your way around on day one
- The widest range of add-ons: ControlNet, LoRA, and upscalers all install in one click
- Shows every setting in a single view
- Img2img and inpainting tabs built right in
- A REST API so other programs can run it without opening the app
- The biggest community, so most guides and troubleshooting tips are written for it
- Best for beginners, photographers, designers, and anyone just starting out
- A node-based layout where you connect boxes like a flowchart
- More detailed control over each step of the process
- Better for multi-step jobs, such as upscaling, refining, and inpainting all in one run
- Uses computer memory more efficiently for large models like Flux
- Takes longer to learn at first: expect a full session just to learn the layout
- The preferred choice for power users and production teams in 2026
- Best for technical users, automated pipelines, and Flux
- Start with AUTOMATIC1111 and learn the basics without fighting the interface
- Stick with A1111 until your projects get too complex for it to handle well
- Move to ComfyUI once you need multi-step automation, Flux, or custom pipelines
- Many experienced users keep both: A1111 for quick tests, ComfyUI for production runs
How to fine-tune Stable Diffusion
LoRA, DreamBooth, and Textual Inversion
The base model is a generalist. Fine-tuning is how you teach it one specific product, face, or art style, so every image after that reliably looks like that subject instead of a rough guess at it. Three methods lead the way: LoRA, DreamBooth, and Textual Inversion. They solve the same problem, but differ in size, speed, and file weight.
Trains a small extra file, usually 20 to 200MB, that sits on top of the base model. It is the fastest to train, the easiest to share, and the default choice for most product, character, and style fine-tunes in 2026.
Retrains the whole model on your subject, giving the strongest and most accurate match to it. It is slower to train and creates a full model file, 2 to 7GB, instead of a small add-on.
Trains a new "word" that the model learns to link to your idea, without changing the model itself. It has the smallest file size and trains the fastest, but it is the least flexible of the three.
Use LoRA for most product, brand, and character work. Use DreamBooth when you need the closest possible match and can wait for a longer training run. Use Textual Inversion for quick style tests that do not need to move between different models.
Step by step: training a LoRA on your own computer. A realistic path for anyone with a graphics card that has at least 8GB of memory, with no cloud costs at all.
Collect 20 to 30 clear reference photos of your subject: front, back, side, and close-up angles for a product, or a mix of expressions and angles for a face. Crop each photo to 512 by 512 pixels, or 768 by 768 for SDXL.
Label every image with one made-up word the model has never seen before, such as "mugxyz," plus a short description. This trigger word is what you type later to bring up the trained subject.
Install the Kohya_ss tool, or use the LoRA training add-on built into AUTOMATIC1111. Point it at your folder of labeled images.
A safe starting setup is: batch size 1, learning rate 1e-4, 1000 total steps, and a save every 100 steps. On a typical graphics card, such as an RTX 3060, expect this to take about 45 minutes.
Load the finished LoRA file into AUTOMATIC1111's LoRA panel, add the trigger word to your prompt, and generate. Compare saves from different points in training. The earliest save that looks right is usually the best pick, since training too long can make results worse.
- Products or brand items: 15 to 30 images from several angles and lighting setups
- Faces or characters: 20 to 40 images with different expressions, angles, and backgrounds
- Art style copying: 30 to 100 images that clearly show the style you want
- Use one consistent size (512 by 512 for SD 1.5, 768 by 768 or larger for SDXL) and one consistent caption format for the whole set
A brand trains a LoRA on 25 photos of one product, then generates endless new backgrounds and settings while keeping the product itself looking exactly the same.
A game studio trains a LoRA on concept art of one character, then generates that same character in new poses, outfits, and scenes for marketing art.
An illustrator trains a LoRA on their own past work, so new prompts automatically come out in their own style, speeding up how fast they can finish jobs.
An agency trains a LoRA on a client's past campaign photos, so every new image matches the brand's look without manual colour editing.
Stable Diffusion models explained
SD 1.5, SDXL, SD3, and Flux
Picking a model version is the first real decision after you install Stable Diffusion. Each version differs in image quality, how much graphics memory it needs, and how many community models are built for it.
The oldest version still widely used. It needs only 4GB of graphics memory, so it runs on cheap hardware. Civitai has more fine-tuned models built on SD 1.5 than on any other base model. Image quality is lower than newer models, but the number of models to choose from is unmatched. It is still the right choice for older or weaker hardware.
Much better image quality than SD 1.5: higher resolution, better prompt following, and more realistic results. It needs 8GB of graphics memory. Running it in two steps (base, then refiner) gives the best results. It is the current standard for most projects that do not need Flux-level quality.
Better at rendering text and getting the overall layout right than SDXL. It needs 10 to 12GB of graphics memory. The licence is different from earlier versions, so check the commercial-use terms before you rely on it. A strong choice when you need accurate text inside images.
Flux comes from Black Forest Labs, the original team behind Stable Diffusion, and it is the current best option for open-source AI images. It gives much better quality, more realistic results, and better prompt following than any earlier version. It needs 12 to 24GB of graphics memory, which usually means a high-end computer or a cloud GPU. It works best inside ComfyUI. Serious users are moving toward Flux in 2026.
- 4GB graphics memory: SD 1.5 with a Civitai community model that matches your style
- 8GB graphics memory: SDXL base plus refiner, for much better quality
- 12GB or more graphics memory: Flux through ComfyUI, the best open-source quality right now
- No graphics card, or want cloud only: try RunDiffusion, Google Colab, or Vast.ai for hosted access to any model
Stable Diffusion without a GPU
cloud and hosted options
Not everyone has a spare graphics card with 12GB or more of memory. For laptops, older desktops, and Apple Silicon Macs that struggle with Flux, a hosted option lets you start generating without buying new hardware. The trade-off is less control and a recurring bill instead of a one-time electricity cost.
A fully hosted version of AUTOMATIC1111 or ComfyUI that runs in your browser. There is nothing to install. You get the same interface you would run locally, streamed to your browser, while RunDiffusion handles the graphics card on its side.
Free, and paid, notebooks that come with a graphics card attached. Widely used for one-off sessions and for running community AUTOMATIC1111 or ComfyUI notebooks without owning a graphics card at all. The free tier has time limits and you may need to wait in a queue.
A marketplace where you rent a graphics card by the hour, including high-end cards for Flux, from a wide pool of providers. You then install and run your own setup exactly like you would at home.
Pick RunDiffusion for a ready-to-go experience with no setup. Pick Colab for occasional, casual use. Pick Vast.ai when you need a specific high-end graphics card on demand without owning one.
| Option | Setup effort | Control | Cost profile |
|---|---|---|---|
| RunDiffusion | None, browser only | Same interface as local A1111/ComfyUI | Recurring, based on use |
| Google Colab | Low, run a notebook | Fair, session time limits apply | Free tier plus paid tiers |
| Vast.ai | Fair, you set up your own instance | Full, your choice of GPU and setup | Pay per hour rented |
| Local hardware | High, a one-time install | Complete | One-time hardware plus electricity |
Where Stable Diffusion genuinely impresses
six things no closed platform can match
No content rules except the ones you set yourself. Nothing stands between your prompt and the final image. For studios, product photography teams, and art direction work, not having a platform judge your output is a real advantage.
Guide the image using pose, depth, edge, and line art references. This turns generation from a guessing game into a directed process. The gap between Stable Diffusion with ControlNet and any closed platform is large, and it is not closing.
Change existing photos, sketches, and renders using a text prompt. Style transfer, photo editing, inpainting, and product visuals all go far beyond plain text-to-image. This depth of img2img control is unique to open-source tools you run yourself.
Train the model on your own photos with Dreambooth or LoRA, using just 10 to 30 reference images. It learns your product, your face, or your brand look. No business contract needed, and no data leaves your machine.
Both AUTOMATIC1111 and ComfyUI offer a REST API. You can run it without opening the app, plug it into your own product, set up batch jobs, or build your own front end on top of it. Closed platforms do not allow this level of connection.
Civitai hosts thousands of community-trained models covering anime, realistic photos, architecture, fashion, and product photography styles. Switch models for different needs without retraining from scratch. It is the biggest open model library in this category.
Stable Diffusion limitations
a few things worth knowing upfront
There is no ready-made version to just open and use. You need Python, CUDA, and 4 to 24GB of graphics memory depending on the model you pick. If that feels like too much, use a hosted option like RunDiffusion or Google Colab instead. You trade some control for less setup. The local path rewards people willing to get past the setup step.
SD 1.5 runs on 4GB of graphics memory, a budget card. SDXL needs 8GB. SD3 needs 10 to 12GB. Flux needs 12 to 24GB, which usually means a high-end desktop or a cloud GPU. A setup that worked fine for SD 1.5 will struggle with Flux. Check your hardware before you pick a model version.
The exact same prompt can give very different results across model versions, samplers, and settings. There is no simple "just type what you want." Better prompts lead to better images. Expect to spend real time learning before your results feel reliable.
Without fine-tuning or ControlNet, keeping the same character, product, or setting consistent across several images takes real effort to set up. This is one of the harder problems in AI image tools, and Stable Diffusion solves it better than any closed tool once it is set up right.
The CreativeML Open RAIL-M licence allows commercial use of the model, but it does not answer every question about the copyright of the training data, whether AI-made images can be copyrighted, or your own risk when fine-tuning on images that are not yours. Get independent legal advice before commercial use.
The official documentation is thin. Most real answers live in Reddit communities, YouTube tutorials, Civitai model pages, and Discord servers. Learning Stable Diffusion means joining that community, which is genuinely one of the best technical communities in AI.
Stable Diffusion licensing and legal notes
what to know before commercial use
An open licence does not automatically mean every use is legally safe. Before you use Stable Diffusion output for business, it helps to understand what the licence actually covers, and what it leaves unanswered.
This licence covers SD 1.5 and SDXL. It allows commercial use of the model and its output, with a short list of banned uses, such as generating illegal content, written into the licence itself.
SD3 and SD3.5 use different terms than SD 1.5 or SDXL. Commercial use above a certain revenue level may need a separate licence from Stability AI. Always check the current terms before using SD3-family models in a paid product.
You can usually sell or use generated output for business under the model's licence. But that licence covers your right to use the model. It is not a guarantee that the output is free of any other claims.
Stability AI has faced lawsuits from Getty Images and a group of artists over how training data was used. These cases are still ongoing and could change future licence terms, so it is worth watching if your use is significant to your business.
The open licence does not settle whether the training data behind the model was used lawfully everywhere. This question sits upstream of anything you generate, and it is separate from how you personally use the model.
Whether a fully AI-made image can be copyrighted at all, and by whom, is still an open question in several countries, including the US, where the Copyright Office's guidance keeps changing. Images with real human editing or direction tend to fare better than a single, untouched generation.
This section is a starting point for your own research, not legal advice. If commercial use matters to your business, an independent legal review is worth the cost before you scale it up.
What Stable Diffusion actually
looks like under the hood
Each version needs different graphics memory and gives different quality. SD 1.5 and SDXL remain the backbone of the Civitai community. Flux is the top quality choice in 2026.
SD 1.5: 4GB. SDXL: 8GB. SD3/3.5: 10 to 12GB. Flux: 12 to 24GB. Apple Silicon works through MPS, but runs slower than NVIDIA.
A1111 has the widest add-on support and is the easiest to start with. ComfyUI uses a node-based layout, and is the choice for Flux and production pipelines.
Change an existing image with a text prompt. Denoising strength controls how far the result moves from the source. Inpainting lets you edit just one area. Both are in the A1111 img2img tab.
Guides the shape of the image. This is the feature that most separates Stable Diffusion from closed tools. You can stack several ControlNet layers in one generation.
Train on 10 to 30 images. LoRA is fastest and smallest. Dreambooth is the most thorough. Textual Inversion learns a concept without changing the full model.
Runs without opening the app, so you can build batch jobs, product workflows, or your own front end on top of the local server.
Commercial use is allowed with some limits. SD3's licence is different, so check Stability AI's terms. The licence covers the model, not your training data or whether the output itself can be copyrighted.
Thousands of community fine-tunes across many styles. The largest open model library in this category. Most are free to download and use commercially.
Hosted Stable Diffusion for people without a local graphics card. RunDiffusion runs A1111 or ComfyUI in a browser. Colab gives free GPU time. Vast.ai rents graphics cards by the hour.
Stable Diffusion for e-commerce product photography
a practical workflow comparison
Product photography is one of the clearest business uses for Stable Diffusion, and one of the best examples of how local and cloud setups change the cost of running a catalogue.
A normal shoot means booking a studio, a photographer, and an editing pass, usually a job that takes several days per product line. Stable Diffusion can shrink that into a same-day job once you have one base photo and a trained LoRA.
A local graphics card suits steady, high-volume catalogue work, since the hardware pays for itself over time. A cloud option like RunDiffusion or Vast.ai suits the occasional campaign, where owning a graphics card all year does not make sense.
One generation takes seconds. A full reshoot for a new background or lighting idea in a normal studio can take one to two weeks. That speed gap adds up fast across a big catalogue or a busy campaign schedule.
Once a product LoRA exists, making new versions, such as new backgrounds, lighting, or seasonal themes, scales far more easily than rebooking a physical shoot for every product and every campaign.
The real cost is not the image generation itself. It is the setup time, the time spent learning prompts, and the LoRA training needed to keep every image looking like the actual product.
A well-trained product LoRA keeps the product looking exactly the same across hundreds of generated images, which is a harder problem to solve consistently with a large team of human editors.
Running Stable Diffusion through its API
building a production pipeline
Both AUTOMATIC1111 and ComfyUI offer a REST API. This turns Stable Diffusion from a tool you click through into a piece you can call from your own product or automated workflow.
Add --api to your AUTOMATIC1111 launch settings and restart the app. The API is now available at localhost:7860, alongside the normal browser interface.
Send a test txt2img request using curl or any HTTP tool, and check that you get an image back before you build any automation around it.
Wrap the same request in Python using the requests library, so you can trigger new images from your own scripts, backend, or scheduled job.
Beyond the prompt, you can control the negative prompt, sampling steps, CFG scale, seed, width, and height, looping through a list of prompts to generate a whole set in one script run.
Real pipelines need a plan for timeouts, running out of memory on large batches, and broken responses. Treat every generation call as something that can fail, not something that always works.
Stable Diffusion for video
animation and video generation
Turning text into still images was Stable Diffusion's original use, but the community has pushed well into motion too. These video tools are newer and rougher than still-image tools, but they are where a lot of the active testing is happening in 2026.
An AUTOMATIC1111 add-on that builds animated clips by blending prompts and camera movement across frames. It is the standard starting point for AI animation built on Stable Diffusion.
Stability AI's own image-to-video model, built specifically to turn a still image into a short video clip with smooth motion, rather than reusing the image model one frame at a time.
The common approach: generate one strong still image first, using a full prompt and ControlNet, then feed that single frame into Stable Video Diffusion to add motion. This combines the precision of image generation with the newer, still developing power of video generation.
Video generation uses far more graphics memory and time than one still image. Expect to need a high-end GPU similar to what Flux needs, and generation times measured in minutes, not seconds, per clip.
Stable Diffusion vs Midjourney
which AI image tool fits your workflow?
Stable Diffusion and Midjourney are not really built for the same person. Knowing where each one wins tells you which one belongs in your workflow.
| Feature | Stable Diffusion | Midjourney |
|---|---|---|
| Setup required | Yes, Python, CUDA, GPU | None, Discord or web |
| Output quality (default) | Good with the right model | Best in category |
| Image-to-image | ✓ Full img2img plus inpainting | Limited |
| ControlNet guidance | ✓ Full support | ✗ Not available |
| Custom fine-tuning | ✓ LoRA, Dreambooth | ✗ Not available |
| API / pipeline use | ✓ Full REST API | Limited |
| Cost to run at volume | Electricity only (local) | Subscription per seat |
| Content restrictions | None, you control it | Set by platform |
| Community models | ✓ Thousands on Civitai | ✗ Single model |
| Learning curve | High, weeks to master | Low, minutes to start |
| Best for | Control, automation, pipelines | Quality, speed, ease |
Choose Stable Diffusion when you need control, automation, and full ownership. Choose Midjourney when you need a great-looking image fast with no setup.
Stable Diffusion learning curve
what to expect session by session
The first real obstacle is not understanding how the AI model works. It is getting your setup running at all: the right Python version, Git, CUDA on Windows, or Metal on Mac. Having a troubleshooting guide ready before you start is a must, not an option. Designers and writers with no command-line experience often get stuck right here.
Once your setup works, the first image comes quickly. It will not look like a default Midjourney image. You spend the session adjusting CFG scale, sampling steps, and negative prompts, and start to see that each setting is a dial, not a simple on or off switch.
You download a community model from Civitai that matches the style you want. The quality jump is big. You try img2img on a photo for the first time, which is the moment Stable Diffusion stops feeling like a text-to-image tool and starts feeling like a full photo editor.
You install ControlNet and use pose control on a reference photo. This is the point where Stable Diffusion stops feeling like a toy and starts feeling like a real production tool. For serious work, this is also when to start looking into LoRA training on your own images, for a consistent brand or character.
Three creators who will
get real value from Stable Diffusion
Comfortable with Python, the terminal, and setting up a graphics card. Wants full control over the model, the output, and the workflow. Building something closed platforms cannot support: custom fine-tunes, automated pipelines, image-to-image tools, or a product built on top of generation.
Producing enough images that per-image API costs add up fast. Needs a consistent brand look across campaigns, which needs custom model training. Has someone technical enough to set up and maintain it. The math clearly favours this path at a large scale.
Exploring how these AI models actually work under the hood. Wants access to model internals, custom samplers, and experimental setups. The open-source world is the only place with this level of access, and the community sharing new methods here has no equal.
Who should
look elsewhere
Being honest about fit is what makes a recommendation worth trusting. Here is when another tool will serve you better.

Stable Diffusion FAQ
questions people actually ask
The verdict
Stable Diffusion made one choice: release the model files to everyone. No platform lock-in. No content filter except the ones you add. No pricing plan that grows against you. No terms of service that can rewrite your commercial rights.
That one choice made it the hardest tool to start with, and the most powerful tool to build on. The learning curve is real. The setup step is a genuine wall for people who are not developers. Getting from a default image to something production-ready takes real, deliberate effort.
But so does ControlNet, once you learn it. So does image-to-image editing, which can turn any photo into a styled render in seconds. So does fine-tuning on your own pictures in under an hour. So does an API that runs inside your product without asking permission. So does a community of thousands sharing trained models for free, the largest open community of its kind.
Stable Diffusion is not the friendliest tool for beginners. It is not the most polished straight out of the box. It is not the tool to reach for if you just want to type a prompt and get a finished image in 30 seconds. Stable Diffusion is the tool that hands you the engine, and then gets out of your way.
Get started with Stable Diffusion
Download the model files, install AUTOMATIC1111 or ComfyUI, and run your first generation on your own computer: no subscription, no platform, full ownership.
 Get Started →